
 If you're a web developer, perhaps you've heard of this newfangeldy “mobile” concept that's been sweeping the world. And perhaps you've even gone so far as reading a tutorial or two on how to create mobile applications. If so, you've seen that you get the delightful choice between Objective C and Swift (iOS), or Java (Android), all of which renders your hard-fought HTML, CSS, and JavaScript knowledge moot.
But, lo! There is hope!
If you're someone for whom writing code in web parlance is a piece of cake (or at least more doable than C/Java), this article will explain how you can use the knowledge you already possess in order to create mobile applications using the following three ingredients:
- jQuery Mobile, an HTML5-based framework for developing web-based mobile applications.
- Drupal 8's Web Services modules, which provide read and write access to Drupal's content for use in your application.
- Adobe PhoneGap, which packages web-based applications as mobile apps for use on platforms such as iOS and Android.
Let's get started!
About Our App
First, when developing mobile applications, it's customary to give some thought to the flow of the user interactions. Here are some basic wireframes:
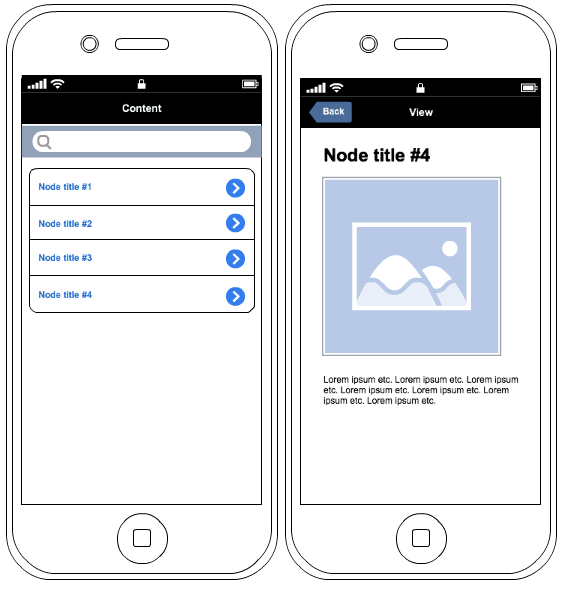
Figure 1: The two main screens of our mobile application: list and view.
The idea of our app is simple: display a list of nodes from the front page of a Drupal 8 site, and provide a links view for the content. Drupal 8’s web services can also edit and delete content, but we'll stick to view, both for article space constraints and to avoid some bugs that are still present in Drupal 8's alpha releases.
Building Your jQuery Mobile App
In PhoneGap, mobile apps are simply web applications, so you can build them with standard HTML, CSS, and JS. However, since building out a UI that looks and acts nicely on a mobile device (with all of the various cross-browser/platform quirks) takes time and effort, we'll be using the jQuery Mobile framework to help get us quickly up and running.
A jQuery Mobile application is simply an HTML5 document that reacts to certain specially named attributes. These specially named attributes will magically result in responsive, mobile-themed UI elements such as listviews, form elements, sliders, and more.
We'll showcase some of jQuery Mobile's capabilities by building our simple application, but to get a full idea of what's possible, check out http://wdog.it/4/2/mobile.
Choose Your Framework
Both jQuery and jQuery Mobile get a lot of criticism from the front-end community for being bloated and slow, particularly for “hybrid” mobile app development like we're doing here (as opposed to a mobile website). Alternative mobile web app development frameworks include Sencha Touch (steeper learning curve, but optimized for WebKit browsers), Ionic Framework (which uses the latest front-end hotness such as Sass and AngularJS), and more. However, jQuery Mobile remains popular because the documentation and examples are excellent (and the syntax is terrific if you're not a JavaScript expert.)
Since I'm not a JavaScript expert, it's what I'll be using in this tutorial, but you can use anything you'd like as long as you have an
index.htmlfile.
Getting Started
We’ll begin by building an outline of our app. For now, we'll just hard-code the data on all screens, but in the next section we'll wire them up to Drupal 8 and make them dynamic.
First: a skeleton HTML5 index.html document that pulls in the necessary jQuery Mobile files and their dependencies, and add a <div> for each page of your app, with a data-role=”page” attribute and a unique id attribute (for linking). Along with a content area, add a header area on each page where you can stick things such as the page title and a back button. We'll make use of jQuery Mobile's "theme swatches" concept to make the heading stand out more with a black background. See http://wdog.it/4/2/pages for more information on pages, and http://wdog.it/4/2/tr for more details about theming.
<!DOCTYPE html>
<html>
<head>
  <meta charset="utf-8" />
  <title>Drupal 8 Web Services Demo</title>
  <meta name="viewport" content="width=device-width, initial-scale=1">
  <link rel="stylesheet" href="http://code.jquery.com/mobile/1.4.3/jquery.mobile-1.4.3.min.css" />
  <script src="http://code.jquery.com/jquery-2.1.1.min.js"></script>
  <script src="http://code.jquery.com/mobile/1.4.3/jquery.mobile-1.4.3.min.js"></script>
</head>


<body>


<div data-role="page" id="list">
  <div data-role="header" data-theme="b">
    <h1>Content</h1>
  </div>
  <div role="main" class="ui-content">
    <p>TODO: Listing page.</p>
  </div>
</div>


<div data-role="page" id="view">
  <div data-role="header" data-theme="b">
    <h1>View</h1>
  </div>
  <div role="main" class="ui-content">
    <p>TODO: View page.</p>
  </div>
</div>


</body>
</html>
If you look at this in your web browser, there's not much at all to see here… yet!
Content Listing Page
On our content listing page, we want a listing of content from our Drupal 8 site, with each row linking to a view page. We also want a search box on top. Sounds pretty complex. But lucky for us, jQuery Mobile has a widget ready to go – Listview – based on a simple HTML list.
The Listview demo page has plenty of examples of different types of Listviews, but the simple "Filter" example will work nicely for us.
Replace <p>TODO: Listing page</p> with the following:
<code>
    <ul id="content-list" data-role="listview" data-filter="true" data-filter-placeholder="Search content..." data-inset="true" data-split-icon="edit">
      <li><a href="#view?id=1">Node Title #1</a></li>
      <li><a href="#view?id=2">Node Title #2</a></li>
      <li><a href="#view?id=3">Node Title #3</a></li>
      <li><a href="#view?id=4">Node Title #4</a></li>
      <li><a href="#view?id=5">Node Title #5</a></li>
    </ul>
</code>
Now open up index.html in your browser, and you should see something like this:
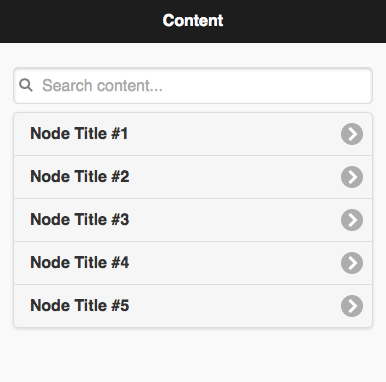
Figure 2: Our mobile app's filterable content listing
Node Title #1 and its ilk link off to the View page (not much there yet) and if you type a 2 in the search box, you'll see that the list automatically filters down to only Node Title #2. Neat!
Content View Page
Next, it's time to build out the View page. Once again, we'll hard-code this one for now. Nothing too fancy here, just regular HTML. The only addition is data-add-back-btn="true" to the header div, which jQuery Mobile will use to render a button that returns you back to the content list. Replace the previous View page with the following:
<div data-role="page" id="view">
  <div data-role="header" data-theme="b" data-add-back-btn="true">
    <h1>View</h1>
  </div>
  <div role="main" class="ui-content">
    <!-- This will get populated from the list page. -->
    <div id="nid"></div>


    <h2 id="title">Node Title</h2>


    <!-- Temporary placeholder image. :) -->
    <img id="image" src="http://placekitten.com/g/200/300" alt="Alt Text" />


    <p id="body">
    Lorem Ipsum etc.
    </p>


  </div>
</div>
Re-load index.html and click on one of the items in the list, and you should see your view page with an adorable kitten.
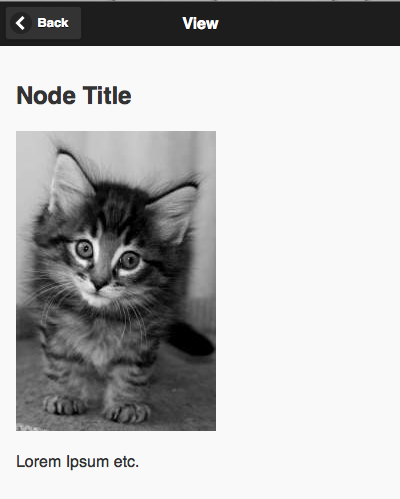
Figure 3: A sample View page showing a node title, body, and image.
URL Parameter Passing
There's a tricky part: passing the ?id=X from the link on the listing page to the content page in order to pull up the proper node. jQuery Mobile doesn't natively support parameter passing, although there are plans for it on the 1.5 roadmap. Fortunately, one can work around this limitation with the helpful library.
Add the following lines just above the closing </head> tag of index.html:
  <script src="https://raw.githubusercontent.com/CameronAskew/jquery.mobile.paramsHandler/master/src/jquery.mobile.paramsHandler-1.4.2.js"></script>
  <!-- Custom JS goes here. -->
  <script src="//www.drupalwatchdog.net/app.js"></script>
Then, create a file called app.js (you can call it whatever you'd like, just update the reference accordingly) and add the following lines to it:
// Add URL parameter parsing to the View page.
$(function () {
    $.mobile.paramsHandler.addPage(
        "view",  // jquery mobile page id which will accept parameters
        ["id"],    // required parameters for that page
        [],         // optional parameters for that page,
        function (urlVars) {
            $("#nid").html(urlVars.id);
        }
    );


    $.mobile.paramsHandler.init();
});
This registers the "view" page as a page which can consume parameters, specifically the id parameter. If found, it will populate <div id="nid"></div> with the ID number that was passed in.
You can try this in action by clicking one of the records on the List page. You should see a “3” or similar above the image.
Drupal 8's RESTful Web Services
One of the great new features in Drupal 8 is its ability to let external applications manage its content via RESTful APIs. (A Drupal 7 equivalent is the RESTful Web Services project.) We'll use this feature to generate JSON for our website content that can then be consumed by our jQuery Mobile app to replace our hard-coded listings with dynamic goodness.
You'll need the following installed and running to get started:
- A web development environment running at least PHP 5.4.
- The latest and greatest Drupal 8 release installed and running using the Standard profile.
- Some Article content on your website. You can either add this manually, or you can use Devel Generate, part of the Devel module.
- A utility to test REST requests and modify headers, such as cURL, Postman for Chrome, or RESTClient for Firefox.
Installing and configuring
- We need to install the required modules. Go to Manage » Extend and enable all of the modules underneath the Web Services grouping:
- Serialization is the base-required module that takes data, encodes it into a specified format (JSON, XML, etc.), and decodes it back again.
- RESTful Web Services allows you to expose REST resources for content entities (nodes, users, taxonomy terms, etc.) on your site.
- HAL (HyperText Application Language) is an extension to JSON/XML that can link related resources such as images.
- HTTP Basic Authentication allows for username/password-protected resources.
- To make testing easier, let's give anonymous users the ability to read REST resources from Drupal. Go to Manage » People » Permissions and check the box for Access GET on content resource for Anonymous users.
- We also want to make the default Frontpage view RESTful so we can use it for our jQuery Mobile app. Go to Manage » Structure » Views and click Edit next to the Frontpage view.
- Under Displays, choose Add, then REST export.

Figure 4: Adding a REST export display to a View
- Under Path Settings » Path click No path is set and enter the path node (same as the Page display’s path). Finally, click Save on the view.

REST Configuration
While the default configuration of REST module will work fine for us, it's worth taking a look at how it's done in case you want to tweak it for your own site. Go to Manage » Configuration » Development » Configuration Management » Single Import/Export » Export. Choose a Configuration type of Simple Configuration and a Configuration name of rest.settings. Here you will see some YAML that shows that by default,
GET,POST,PATCH, andDELETEare supported for all nodes. Here's an excerpt:resources: 'entity:node': GET: supported_formats: - hal_json supported_auth: - basic_auth # (Repeat above for POST, PATCH, DELETE.)This configuration allows you to enable REST for other entity types as well – such as taxonomy – or switch authentication to something like
oauth, orsupported_formatstoxml. To make changes, you can either do them here and then copy/paste the amended YAML into the "Import" side of the Single Import/Export form, or use the contributed REST UI module. See http://wdog.it/4/2/rest for more details and examples.
If you look at http://example.com/node in your web browser, you won't see anything different. However, if you pop open something like Postman, and give the request a header of Accept: application/hal+json, you should see some lovely JSON output. Hooray! You should see a similar thing if you hit a single node's URL, such as http://example.com/node/2.

Figure 5: Viewing RESTful content from Drupal in Postman
Wiring up jQuery Mobile and Drupal 8 REST
Okay, now that we have some dynamic data coming from Drupal, let's wire it up into our app. We'll do this with jQuery's $.ajax() method. (See http://wdog.it/4/2/ajax for more details.)
In your app.js file, add the following (replacing EXAMPLE.COM with the address to your Drupal 8 site):
$(document).on("pageinit", "#list", function( event ) {
  $.ajax({
    url: "http://EXAMPLE.COM/node",
    type: "GET", // Default.
    // Add custom header for HAL.
    beforeSend: function( jqXHR ) {
      jqXHR.setRequestHeader('Accept', 'application/hal+json');
    }
  })
  .done(function( data ) {
    var items = [];


    // Request was successful; loop through each result.
    $(data).each(function( key, value ) {
      var title = $(data)[key]["title"][0]["value"];


      // Get the node ID of the record from the end of the URL.
      // @todo: There *has* to be a better way than this. :P
      var url = $(data)[key]["_links"]["self"]["href"];
      var nid = url.substring(url.lastIndexOf('/') + 1);


      // Build an array of rows.
      items.push('<li><a href="#view?id=' + nid + '">' + title + '</a></li>');
    });


    // Add rows to the listview.
    $("#content-list").append( items.join('') );


    // Refresh the listview to style the new rows.
    $("#content-list").listview("refresh");
  })
  .fail(function() {
    alert( "error" );
  });
});
Remove the hard-coded list items from the index.html file and reload. Your listing page should now be populated by Drupal data.
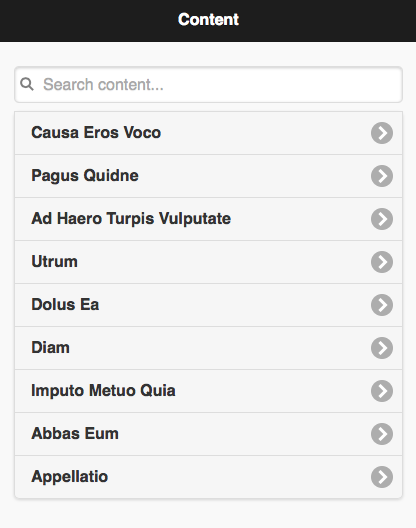
Figure 6: Listing page now dynamically populated with Drupal data.
We'll need a similar AJAX call out for the View page. This exercise is left up to the reader. (See http://wdog.it/4/2/d8ws if you get stuck.)
PhoneGap
At long last, it's time to turn our awesome jQuery Mobile app into a real mobile application, using PhoneGap!
PhoneGap can be installed using the instructions at http://wdog.it/4/2/guide to add the cordova command-line interface as well as SDKs for your target platforms of choice (iOS, Android, etc). However, the setup process is quite lengthy and requires careful, detailed-instruction reading. You're also limited in your target platforms, based on the operating system of your local machine (for example, the iOS SDKs can only be installed on a Mac).
To work around these limitations, we'll use the Adobe PhoneGap Build service, which does all of this in the cloud. You get one free public app, which is fine for our needs.
PhoneGap or Apache Cordova?
It doesn't take much digging into PhoneGap before you'll find a reference to "Cordova" or "Apache Cordova." What's the difference? Apache Cordova is the core framework, distributed under the open source Apache 2.0 License. Adobe PhoneGap is a "distribution" of Cordova that couples the open source project with integration with other Adobe products, such as PhoneGap Build.
PhoneGapping Your App
- Create a public GitHub repository for your code. (The free version of PhoneGap Build only allows public GitHub repos; paid plans have more options.)
- Commit and push your code to the repo, with your
index.htmlin the root directory. - Head to the Sign in page and choose to sign in with Github.
- On the Your apps page, click the open-source tab, select your repository and appropriate branch/tag (defaults to master) from the list, and click the Pull from .git repository button.
- After a few moments you should see an entry with your GitHub URL and a prompt for an App name and description. Go ahead and fill those in.
- Click the Ready to Build button. After a few moments you should see icons start to come alive for the various platforms: iOS, Android, Windows Phone, as well as a QR code you can use to scan.
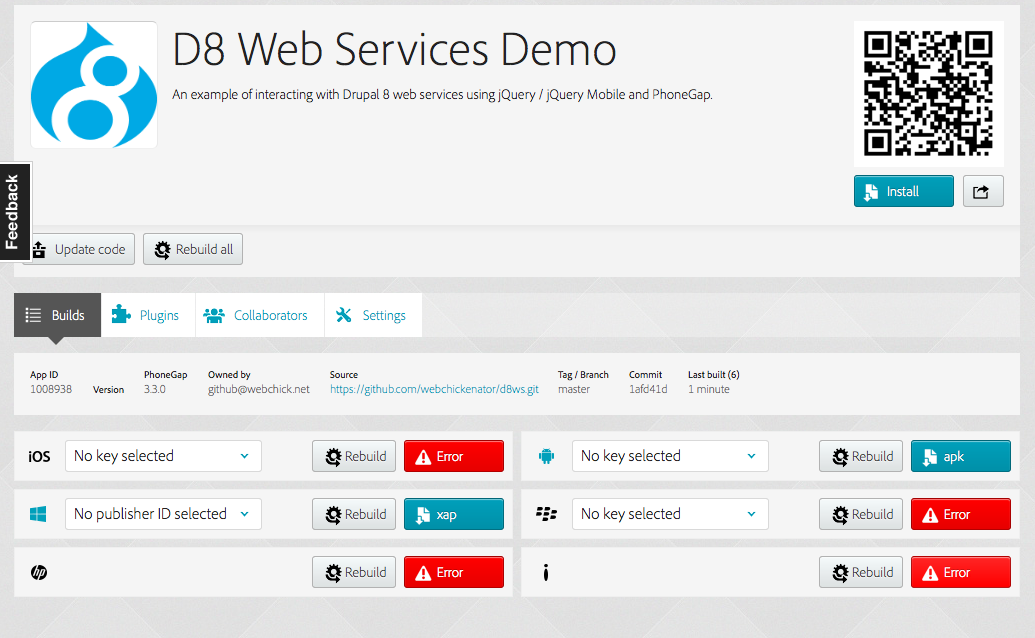
Figure 7: PhoneGap dashboard, showing compilation statuses.

Most of these platforms, such as iOS and Blackberry, will show an "Error" as the result. This is because they require additional steps; e.g. iOS requires enrollment in the iOS developer program ($99/year) in order to obtain a signing key. Check the "Signing" section of the PhoneGap documentation for information on your target platform of choice.
Testing
Well, it looks like the Android version made the trip at any rate. Let's test it out and see. Click on the apk link to download the file, which will be something like D8WebServicesDemo-debug.apk.
If you have an Android device available, there are numerous resources online about how to perform "sideloading" of .apk files, such as http://wdog.it/4/2/install.
If you don't, one easy way to test your app is with an Android emulator such as BlueStacks. With BlueStacks, you can run the following command (on Mac; Windows is similar):
/Applications/BlueStacks.app/Contents/Runtime/uHD-Adb install -r D8WebServicesDemo-debug.apk
Then, under the My Apps selection… voila!
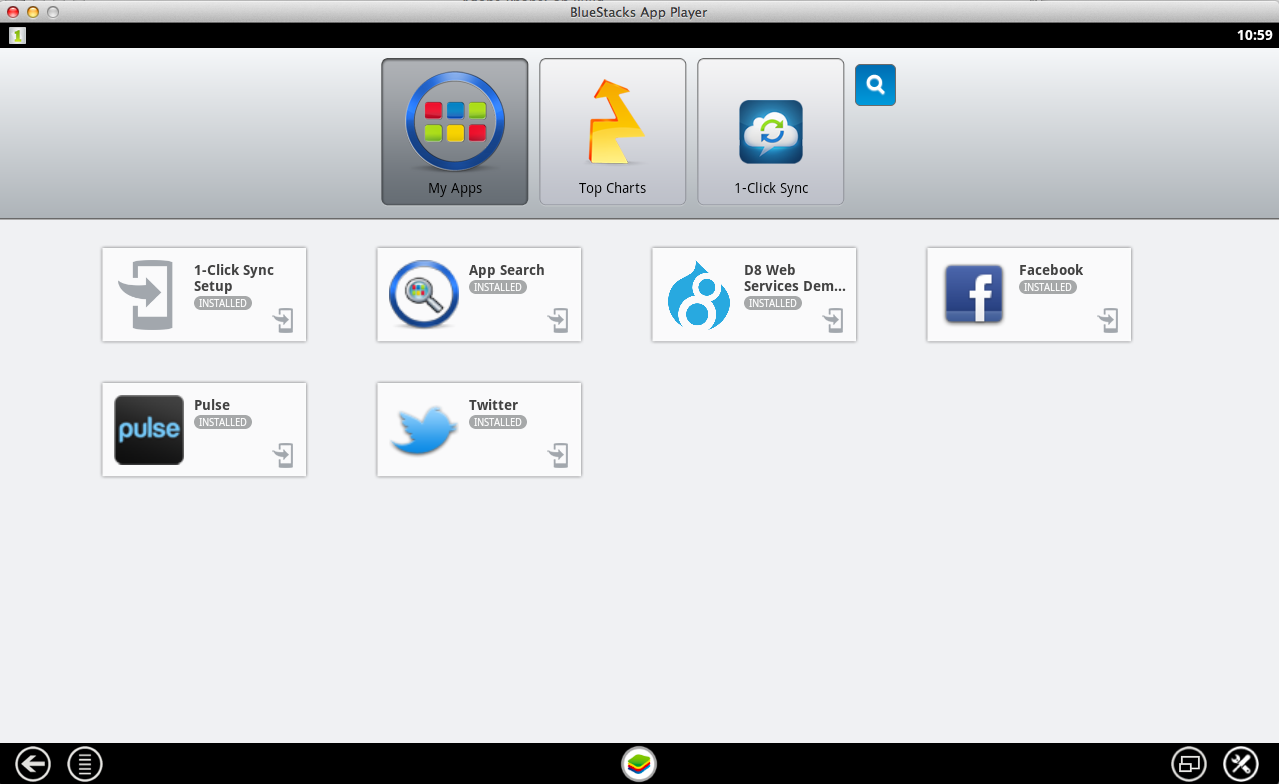
Figure 8: BlueStacks dashboard, showing a Drupal 8 icon on our custom app.
And that’s a wrapp!